 Netherlands (English)
 België
 Deutschland
 Finland
 Ireland
 Luxembourg
 Portugal
 Poland
 Österreich
 France
 España
 Italia
 Sverige
 Danmark


Do It Yourself
Why is bike maintenance so important?
- It helps to minimise wear and to keep the various parts in good condition.
- Your bike meets warranty conditions.
- Treat your bike as you would a car: an annual inspection and regular servicing.
- Extended problem-free riding.
Where best to go?
- For servicing you can always come to one of our workshops or go to your local bike repair shop.
- For sports bikes we recommend that you visit a dealer who also sells road and mountain bikes.
- Electric bikes should also be checked for software updates once a year. Every electric bike has a board computer which requires regular updates.
- It would be best to find a dealer who sells the same brand you have bought from us, as they will have experience with this brand, any specialist tools they may need, and original parts in stock.
First servicing
Your bike should go in for its first servicing after some 500 km and within 6 months after purchase. What frequently happens is that the gear cables stretch a bit which makes shifting less smooth, or that spokes loosen which decreases wheel pressure. In addition, all nuts and bolts should be checked and tightened if necessary, and gears and brakes can be adjusted for optimal performance.
Annual servicing
When your bike has had its first servicing, annual maintenance is an absolute must to ensure that you can enjoy your bike for a long time. Your bike is exposed to wind and weather and, thus, prone to wear. Regular maintenance may help to minimise wear and to prevent unpleasant surprises.
Techcenter
In our blog in the Techcenter we collect tutorials on how to do your own bike maintenance. The Parktool website is an elaborate reference guide as well, with pictures and videos of various repairs. Of course, you can also contact our customer service, who may offer suggestions and recommend helpful videos and reference materials.Mountain bike
When you take your mountain bike into the woods you make great demands on it, exposing it to mud, dirt, water, repeated hard starts, steep descents, large pits and potholes - all this causes wear and tear on your beautiful bike. This is precisely why it is so important to bring your MTB in for servicing.
As a rule, what can you do yourself to keep your bike in top condition?
- Do not spray your bike with a pressure washer but wash it with soapy water instead. The pressure washer is so strong that it will spray the grease from the rotating parts.
- Clean the chain regularly with a dry cloth. Lubricate it with chain oil (WD40 is not sufficiently weatherproof) after every other ride, or more often. Only lubricate the chain, the cassette does not need it.
- Check your disc brake and/or v-brake pads regularly. If they make an abrasive noise, have the brake pads replaced at your local specialist bike shop. Or, if you can, replace them yourself with the instructions from one of the many YouTube videos.
- Check tyre pressure regularly. You will find the maximum tyre pressure printed on the side of the tyre. In general, a mountain bike tyre is inflated to 2 - 2.5 bar.
- Check your nuts and bolts regularly as well. As they vibrate a lot they may well loosen a bit over time. A simple tightening will suffice.
- If you want to reassemble your pedals, seatpost or stem use assembly paste or grease to make sure that you can loosen it again later on.
Road bike
Whether you are a fair weather cyclist or one who will go out in any type of weather, every road bike needs maintenance.
As a rule, what can you do yourself to keep your bike in top condition?
- Do not spray your bike with a pressure washer but wash it with soapy water instead. The pressure washer is so strong that it will spray the grease from the rotating parts.
- Clean the chain regularly with a dry cloth. Lubricate it with chain oil (WD40 is not sufficiently weatherproof) after every other ride, or more often. Only lubricate the chain, the cassette does not need it.
- Check your brake pads regularly. If the wear dashes are no longer visible or have worn off unevenly, have the brake pads replaced at your local specialist bike shop. Or, if you can, replace them yourself with the instructions from one the many YouTube videos.
- Check tyre pressure regularly. You will find the maximum tyre pressure printed on the side of the tyre. In general, a road bike tyre is inflated to 7 - 8.5 bar.
- Check your nuts and bolts regularly as well. As they vibrate a lot they may well loosen a bit over time. A simple tightening will suffice, then, but make sure not to overdo it or you won’t be able to unscrew them later on.
- If you want to reassemble your pedals, seatpost or stem use assembly paste or grease to make sure that you can loosen it again later on.
Electric bike
Electric bikes are wonderful green products which will take you to your destination quickly and help you when the going gets tough. They do have some specific requirements though.
- Take your bike to a brand dealer at least once a year to have it checked for software updates.
- Check tyre pressure regularly, as decreased tyre pressure reduces the bike’s range.
- Cold has a negative effect on the battery. If the temperature drops below 10 degrees the range is reduced considerably - by 10 to 15 percent, in general. This also applies to the charging time. The lower the ambient temperature, the longer the charging time. If possible, charge the battery at room temperature.
- Check the brakes regularly. An electric bike rides faster, so it is important that you can stop in time.
- Do you get error messages on your display? Then contact a local bike mechanic.
City bike
The word city bike sort of says it all, this type of bike is used in the city and, therefore, often for commuting. As such, we don’t always treat it with the utmost care but we do expect it to take us to our destination every day.
What can you do yourself to keep your bike in top condition?
- Make sure that your tyres have the right pressure, as it tends to drop when the bike stands outside a lot. So check your tyre pressure regularly.
- Also, check regularly whether your brakes still work properly.
- Do you have an open chain guard? Then lubricate your chain regularly with chain oil to ensure that everything keeps running smoothly.
- Do the gears shift less smoothly or do you hear a rattling in the chain guard? Have a bike mechanic look at it. It would be a shame if something breaks as a result.
Bosch Active Line Original Instructions NL
Bosch Performance Line Original Instructions NL
Shimano Steps
Shimano Steps Owner’s Manua NLl
Gazelle
User Manual NL
Innergy User Manual EN
Pure Innergy User Manua ENl
Xtra Excellent Innergy User Manual EN
Easy Glider User Manua NLl
Cabby User Manual EN
Gazelle with Bosch System Part 1 NL
Gazelle with Bosch System Part 2 German DE
Sparta
User Manua ENl
Manual Ion NL
Charging Instructions Card Ion NL
Manual E-motion X2 NL
Manual E-Motion 24V NL
Manual E-Motion 36V NL
Manual Original - Pickup Xtra - Country Tour & Amazone 4life Electric NL
Manual Fold-E EN
Manual Bosch Active motor - B-Special, B2 & B4 EN
Batavus
User Manual NL
Manual Recreational EN
Manual Sports/ATB NL
Manual Hybrid Bike NL
Manual Children’s Bikes NL
Manual Nova EN
Manual Padova Easy
Manual LI-ION NL
Manual E-go EN
Manual E-go with Bosch Technology EN
Manual E-go RemovE EN
Manual Monaco/Batavus E-go 36V EN
Manual BUB Easy, PBE & E-GO NL
Cube
Handbook MTB EN
Handbook Road Bike EN
Handbook Trekking EN
Handbook Kids BMX EN
User Manua NLl
Giant
User Manual NL
Manual Twist NL
Manual Twist Go NL
Manual Twist Lite Power NL
Manual Halfway NL
Scott
Scott General Info EN
Scott Owner’s Manual Road Bike EN
Haibike
Original instructions EN
Pegasus
Pegasus Manual E-Bike NL
Cortina
Cortina Conditions of Use EN
When our mechanics have finished preparing your bike in our workshop and done a test run, they will turn the handlebar and remove the pedals so that the bike can be delivered to you without damage. Our carrier then reassembles the pedals and straightens the handlebar. Obviously, there is no obligation to use this service, you can also do it yourself! Please find below some instructions as to which tools you need and what to do.
Assembly instructions for mountain and road bikes.
In these instructions you will find how to mount the handlebar properly on a mountain or road bike. These bikes have what is called an A-head stem. Click here for an enlarged version of the MTB instructions and here for the road bike instructions.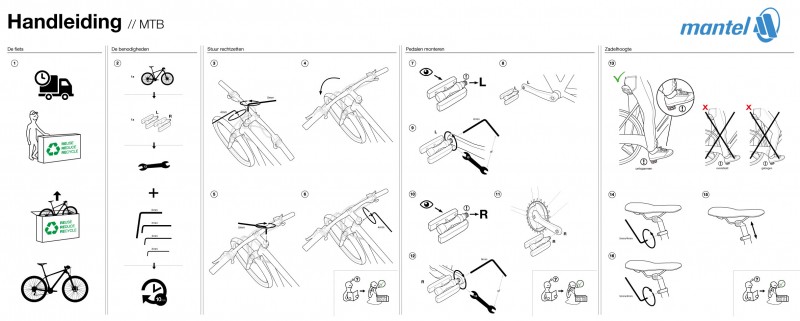
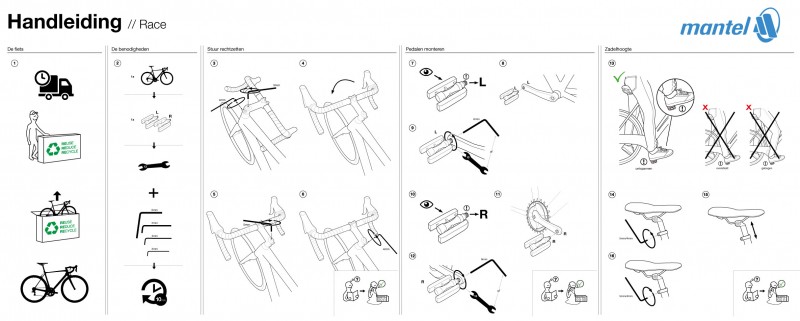 How to straighten the handlebar
- Loosen the top cap on your stem a couple of turns and do the same with the bolts.
- You can now rotate the handlebar a quarter turn. Turn it straight, at right angles to the tyre.
- Now, tighten the top cap by hand. The top cap ensures that you have no slack. If the handlebar turns heavily, you have tightened the top cap too much. If you feel a tap in the steering head, the top cap should be tightened a bit more.
- Finally, tighten the bolts on the stem alternately. Tightening by hand will suffice.
- When you’re installing the pedals please note that the left pedal will only fit in the left crank, and the right pedal only in the right crank. The right crank is where the chain rings are. Near the thread on your pedal you will see an 'L' for left or an 'R' for right.
- Start by turning the pedals in by hand, as far as you can. If you cannot turn the pedal a couple of times by hand, check again if you have the 'L' or 'R'.
- When you can no longer turn by hand, take a tool. Some pedals can be tightened with a 15mm pedal spanner, others require an Allen key.
- Tighten the pedal well. If it is not tight enough, it may come off later on and damage the thread.
- Sit on the saddle and stretch your leg without overstretching it. When the leg is straight you should be able to put your heel on the pedal. As you cycle with the ball of your foot this method of measuring ensures that your leg is slightly bent in its normal cycling position.
- If your saddle is too low or too high, loosen the Allen key a few turns and move the saddle up or down.
- When the saddle is at the right height, tighten the seat clamp. Again, tightening by hand will suffice.
Assembly instructions for a standard stem.
In these instructions you will find how to install your handlebar properly on a standard stem, with which many city bikes are equipped. Click here for an enlargement.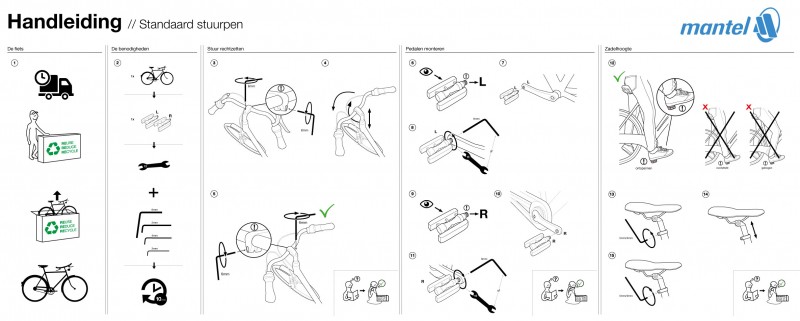 How to straighten the handlebar
- Using an Allen key, loosen the bolt a couple of turns, which will suffice to be able to turn the handlebar.
- Rotate the handlebar a quarter turn until it is at right angles to the tyre. If necessary, you can also adjust the height of the handlebar now by pulling the stem up a bit. Then, tighten the bolt well.
- When you’re installing the pedals please note that the left pedal will only fit in the left crank, and the right pedal only in the right crank. The right crank is where the chain rings are. Near the thread on your pedal you will see an 'L' for left or an 'R' for right.
- Start by turning the pedals in by hand, as far as you can. If you cannot turn the pedal a couple of times by hand, check again if you have the 'L' or 'R'.
- When you can no longer turn by hand, take a tool. Some pedals can be tightened with a 15mm pedal spanner, others require an Allen key.
- Tighten the pedal well. If it is not tight enough, it may come off later on and damage the thread.
- Sit on the saddle and stretch your leg without overstretching it. When the leg is straight you should be able to put your heel on the pedal. As you cycle with the ball of your foot this method of measuring ensures that your leg is slightly bent in its normal cycling position.
- If your saddle is too low or too high, loosen the Allen key a few turns and move the saddle up or down.
- When the saddle is at the right height, tighten the seat clamp. Again, tightening by hand will suffice.
Assembly instructions for an adjustable stem.
In these instructions you will find how to install your handlebar properly on an adjustable stem, with which many city bikes are equipped. Click here for an enlargement.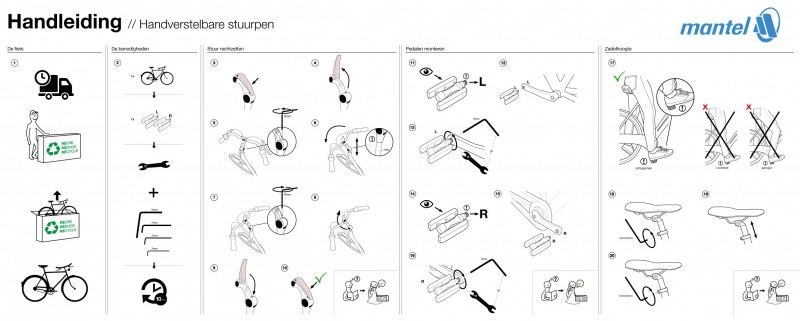 How to straighten the handlebar
- Open the handle on top of the stem.
- Using an Allen key, loosen the bolt a couple of turns, which will suffice to be able to turn the handlebar.
- Rotate the handlebar a quarter turn until it is at right angles to the tyre. If necessary, you can also adjust the height of the handlebar now by pulling the stem up a bit. Then, tighten the bolt well.
- If you want, you can tilt the handlebar into a comfortable position. Then, close the handle et voilà, the handlebar is fixed.
- When you’re installing the pedals please note that the left pedal will only fit in the left crank, and the right pedal only in the right crank. The right crank is where the chain rings are. Near the thread on your pedal you will see an 'L' for left or an 'R' for right.
- Start by turning the pedals in by hand, as far as you can. If you cannot turn the pedal a couple of times by hand, check again if you have the 'L' or 'R'.
- When you can no longer turn by hand, take a tool. Some pedals can be tightened with a 15mm pedal spanner, others require an Allen key.
- Tighten the pedal well. If it is not tight enough, it may come off later on and damage the thread.
- Sit on the saddle and stretch your leg without overstretching it. When the leg is straight you should be able to put your heel on the pedal. As you cycle with the ball of your foot this method of measuring ensures that your leg is slightly bent in its normal cycling position.
- If your saddle is too low or too high, loosen the Allen key a few turns and move the saddle up or down.
- When the saddle is at the right height, tighten the seat clamp. Again, tightening by hand will suffice.
Assembly instructions for an A-head adjustable stem.
In these instructions you will find how to install your handlebar properly when you have an A-head adjustable stem, with which many higher-end electric bikes are equipped.Click here for an enlargement.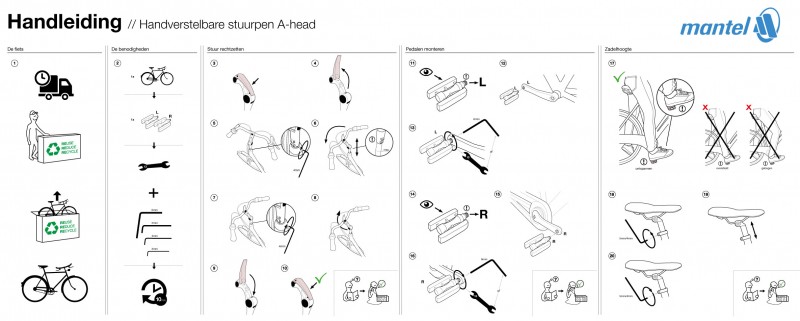 How to straighten the handlebar
- Open the handle on top of the stem.
- Using an Allen key, loosen the two bolts a couple of turns.
- Rotate the handlebar a quarter turn until it is at right angles to the tyre. If necessary, you can also adjust the height of the handlebar now by pulling the stem up a bit without going over the max line. Then, tighten the bolts well.
- If you want, you can tilt the handlebar into a comfortable position. Then, close the handle et voilà, the handlebar is fixed.
- When you’re installing the pedals please note that the left pedal will only fit in the left crank, and the right pedal only in the right crank. The right crank is where the chain rings are. Near the thread on your pedal you will see an 'L' for left or an 'R' for right.
- Start by turning the pedals in by hand, as far as you can. If you cannot turn the pedal a couple of times by hand, check again if you have the 'L' or 'R'.
- When you can no longer turn by hand, take a tool. Some pedals can be tightened with a 15mm pedal spanner, others require an Allen key.
- Tighten the pedal well. If it is not tight enough, it may come off later on and damage the thread.
- Sit on the saddle and stretch your leg without overstretching it. When the leg is straight you should be able to put your heel on the pedal. As you cycle with the ball of your foot this method of measuring ensures that your leg is slightly bent in its normal cycling position.
- If your saddle is too low or too high, loosen the Allen key a few turns and move the saddle up or down.
- When the saddle is at the right height, tighten the seat clamp. Again, tightening by hand will suffice.