 Nederland
 België
 Deutschland
 Finland
 Ireland
 Luxembourg
 Portugal
 Poland
 Österreich
 France
 España
 Italia
 Sverige
 Danmark


Vejl. udsalgspris 396
312
- Levering 2-3 arbejdsdage
- Gratis levering med Track & Trace over 399 kr
- Trustpilot bedømmelse 4.6/5
- Nem returnering


Stil et spørgsmål om dette produkt

Fordele og ulemper
Fordele og ulemper
- Complete set with everything you need!
- For your mountain bike, gravel bike or road bike.
- Available in three different variants, varying in rim tape width.
- Only available with a valve length of 44 mm.
Specifikationer
Specifikationer
| Mærke | Muc-Off | |
| Type | Sæt | |
| Ventillængde | 44 mm |
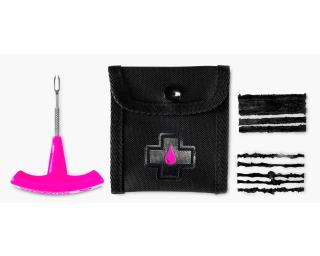
With the Ultimate Tubeless Kit from Muc-Off, you immediately have everything you need to make your wheelset completely tubeless!
Tubeless Valves
The new lightweight tubeless valves from Muc-Off are made of high quality and strong 7075 aluminium and make inflating your tyres even easier, thanks to the special airflow system. The included core remover makes it easy to run sealant through your valve into your tyre.
No Puncture Hassle Sealant
This set comes with two bags of Muc-Off lightweight sealant, which fills a puncture up to 6 mm easily and quickly. Plus, the UV dye makes it easy to detect a leak. The bag has a capacity of 140 ml, enough for even the widest mountain bike tyres, and fits seamlessly onto the tubeless valve for ultimate convenience.
1 x 10 m long roll of Tubeless Rim Tape (choice of 21, 25 or 30 mm width)
2 x Rim tape sticker
2 x Tubeless Valve (black)
1 x Valve core remover
3 x Rubbers for valves
2 x No-Puncture Hassle Tubeless Sealant
2 x Rim tape sticker
2 x Tubeless Valve (black)
1 x Valve core remover
3 x Rubbers for valves
2 x No-Puncture Hassle Tubeless Sealant
Step 1: Remove any old rim tape or tape and clean the rim.
Step 2: Make sure the rim is clean and dry before applying the tape.
Step 3: Remove the tape from the packaging and align it from the opposite side of the valve.
Step 4: Start unwinding a small piece of the tape and press it down with your thumb or finger to apply pressure.
Step 5: Hold on while pulling on the tape and tape it down tightly. Once you have a few cm on the trim, it will stick and holding is no longer necessary.
Step 6: Go completely around the rim like this (if it has a large cavity, you can pull and wiggle the tape to fill any edges).
Step 7: Overlap the tape by about 10 - 15 cm.
Step 8: Leave a small piece loose so you can cut off the excess.
Step 9: Once cut, pull the tape down to create a seal.
Step 10: Go around the rim with your thumb to make sure there are no air bubbles or messy areas.
Step 11: When you are happy with how it looks, use a small pin to find the valve hole and poke neatly through the tape, ready for the valve.
Step 12: Take your tubeless valve and remove the locknut and o-ring.
Step 13: Choose the right rubber fit for your rim tape and insert the valve into the rim.
Step 14: Reinstall the O-ring and locknut, making sure to lock the valve (don't over-tighten as this may damage the rubber).
Step 15: Reinstall your tyre of choice, being careful not to damage the tape (by using tyre levers, for example).
Step 16: Pump air into the tyre to create a fit (you should hear some popping noises around the rim).
Step 17: Release air and remove the valve core using the spare valve cap.
Step 18: Take the Sealant Pouch and shake it well before use.
Step 19: Unscrew the cap and attach it to the valve in an upright position.
Step 20: While holding the pouch, turn the wheel downwards so that the pouch is now upside down.
Step 21: Add the sealant by rolling the pouch downwards.
Step 22: Turn the wheel upright again and remove the pouch.
Step 23: Reinsert the valve core and pump up to your desired tyre pressure.
Anmeldelser
Anmeldelser
Gennemsnitlig fra 8 Anmeldelser
Billeder fra kunder

Nyeste anmeldelser
5 / 5
Helt rigtigt
- Joris 26 januar 2026
Jeg har aldrig selv sat et sæt slangeløse hjul på før, men det gik uden problemer. Ideel til fjolset, der gerne vil prøve selv!
Fordele og ulemper
Komplet sæt
Nemme instruktioner
Solid
Nej til
Automatisk oversat
5 / 5
Produkt i topkvalitet
- Danny 17 marts 2025
nem at bruge, især takket være muc-offs online video
Fordele og ulemper
god online video
masser af variation i ventiler
nem at bruge
tætner godt!
ingen forklaring på, hvilken ventil der er bedst at bruge
Automatisk oversat
4 / 5
Gør, hvad den skal gøre
- Michael 21 november 2024
Let at anvende og normalt af god kvalitet. I mit tilfælde var en ventil gået i stykker, jeg havde en anden liggende, så det blev hurtigt løst
Fordele og ulemper
Gør nemt dæk slangeløse
Komplet sæt
En ventil var i stykker
Automatisk oversat
5 / 5
Prisbilligt slangeløst sæt
- Matthijs 22 august 2024
God at installere selv, lækkede lidt i starten, men efter et par omgange lukker små lækager sig af sig selv
Fordele og ulemper
Godt sæt til at gøre selv
Nok tape
Ventil med flere forbindelsesgummier
Ekstra latexpose ville være praktisk
Automatisk oversat
5 / 5
Alt hvad du behøver for at gøre dine dæk slangeløse i 1 pakke
- Steve 14 august 2024
Lever fuldt ud op til forventningerne, har aldrig sat slangeløse dæk på så nemt
Fordele og ulemper
Let at bruge
Automatisk oversat
Ofte købt sammen
Ofte købt sammen
Anbefalet af produktspecialisten
Anbefalet af produktspecialisten
