 Nederland
 België
 Deutschland
 Finland
 Ireland
 Luxembourg
 Portugal
 Poland
 Österreich
 France
 España
 Italia
 Sverige
 Danmark


¿Quisieras haber visto más fotos de este producto?
- Entrega entre 4-5 días laborables
- Envío gratuito desde 99,00€
- Valoración de Trustpilot 4.7/5
- Devoluciones fáciles


Haz una pregunta sobre este producto.

Pros y Contras
Pros y Contras
- Complete set with everything you need!
- For your mountain bike, gravel bike or road bike.
- Available in three different variants, varying in rim tape width.
- Only available with a valve length of 44 mm.
Especificaciones
Especificaciones
| Marca | Muc-Off | |
| Tipo | Kit | |
| Longitud de la válvula | 44 mm |
Tubeless Valves
The new lightweight tubeless valves from Muc-Off are made of high quality and strong 7075 aluminium and make inflating your tyres even easier, thanks to the special airflow system. The included core remover makes it easy to run sealant through your valve into your tyre.
No Puncture Hassle Sealant
This set comes with two bags of Muc-Off lightweight sealant, which fills a puncture up to 6 mm easily and quickly. Plus, the UV dye makes it easy to detect a leak. The bag has a capacity of 140 ml, enough for even the widest mountain bike tyres, and fits seamlessly onto the tubeless valve for ultimate convenience.
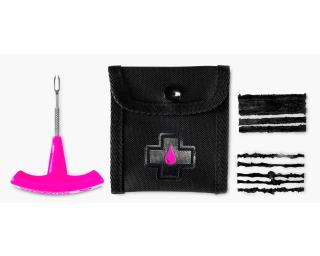
2 x Rim tape sticker
2 x Tubeless Valve (black)
1 x Valve core remover
3 x Rubbers for valves
2 x No-Puncture Hassle Tubeless Sealant
Step 2: Make sure the rim is clean and dry before applying the tape.
Step 3: Remove the tape from the packaging and align it from the opposite side of the valve.
Step 4: Start unwinding a small piece of the tape and press it down with your thumb or finger to apply pressure.
Step 5: Hold on while pulling on the tape and tape it down tightly. Once you have a few cm on the trim, it will stick and holding is no longer necessary.
Step 6: Go completely around the rim like this (if it has a large cavity, you can pull and wiggle the tape to fill any edges).
Step 7: Overlap the tape by about 10 - 15 cm.
Step 8: Leave a small piece loose so you can cut off the excess.
Step 9: Once cut, pull the tape down to create a seal.
Step 10: Go around the rim with your thumb to make sure there are no air bubbles or messy areas.
Step 11: When you are happy with how it looks, use a small pin to find the valve hole and poke neatly through the tape, ready for the valve.
Step 12: Take your tubeless valve and remove the locknut and o-ring.
Step 13: Choose the right rubber fit for your rim tape and insert the valve into the rim.
Step 14: Reinstall the O-ring and locknut, making sure to lock the valve (don't over-tighten as this may damage the rubber).
Step 15: Reinstall your tyre of choice, being careful not to damage the tape (by using tyre levers, for example).
Step 16: Pump air into the tyre to create a fit (you should hear some popping noises around the rim).
Step 17: Release air and remove the valve core using the spare valve cap.
Step 18: Take the Sealant Pouch and shake it well before use.
Step 19: Unscrew the cap and attach it to the valve in an upright position.
Step 20: While holding the pouch, turn the wheel downwards so that the pouch is now upside down.
Step 21: Add the sealant by rolling the pouch downwards.
Step 22: Turn the wheel upright again and remove the pouch.
Step 23: Reinsert the valve core and pump up to your desired tyre pressure.
Opiniones
Opiniones
Fotos de clientes

Los comentarios más recientes
5 / 5
Lo justo
Nunca antes había puesto un juego de ruedas sin cámara, pero funcionó sin problemas. Ideal para el zoquete que quiera probarlo por sí mismo.
Pros y Contras
5 / 5
producto de primera calidad
fácil de usar, especialmente gracias al vídeo en línea de muc-off
Pros y Contras
4 / 5
Hace lo que tiene que hacer
Es fácil de aplicar y suele ser de buena calidad. En mi caso, se rompió una válvula, tenía otra por ahí así que se solucionó rápidamente
Pros y Contras
5 / 5
Conjunto tubeless asequible
Bueno para instalarlo uno mismo, al principio goteaba ligeramente pero después de unas cuantas vueltas las pequeñas fugas se cierran solas
Pros y Contras
5 / 5
Todo lo que necesitas para hacer tus neumáticos tubeless en 1 pack
Cumple plenamente las expectativas, nunca he puesto neumáticos tubeless tan fácilmente
Pros y Contras
4
Hace lo que tiene que hacer
Es fácil de aplicar y suele ser de buena calidad. En mi caso, se rompió una válvula, tenía otra por ahí así que se solucionó rápidamente
-
Fabricar neumáticos sin cámara fácilmente
-
Juego completo
-
Una válvula estaba rota
5
Conjunto tubeless asequible
Bueno para instalarlo uno mismo, al principio goteaba ligeramente pero después de unas cuantas vueltas las pequeñas fugas se cierran solas
-
Gran conjunto para hacerlo tú mismo
-
Suficiente cinta
-
Válvula con múltiples gomas de conexión
-
Una bolsa de látex adicional sería útil
A menudo se compran juntos
A menudo se compran juntos
Recomendado por el especialista de producto
Recomendado por el especialista de producto

