 Nederland
 België
 Deutschland
 Finland
 Ireland
 Luxembourg
 Portugal
 Poland
 Österreich
 France
 España
 Italia
 Sverige
 Danmark


Rek. pris 582
Från 436
- Leverans inom 3-5 arbetsdagar
- Fri frakt vid 699 kr
- Trustpilot omdöme 4.6/5


Hjälper den här sidan dig med ditt val?
Ställ en fråga om denna produkt

För- & Nackdelar
För- & Nackdelar
- Complete set with everything you need!
- For your mountain bike, gravel bike or road bike.
- Available in three different variants, varying in rim tape width.
- Only available with a valve length of 44 mm.
Specifikation
Specifikation
| Märke | Muc-Off | |
| Typ | Set | |
| Ventillängd | 44 mm |
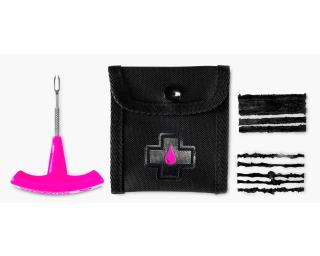
With the Ultimate Tubeless Kit from Muc-Off, you immediately have everything you need to make your wheelset completely tubeless!
Tubeless Valves
The new lightweight tubeless valves from Muc-Off are made of high quality and strong 7075 aluminium and make inflating your tyres even easier, thanks to the special airflow system. The included core remover makes it easy to run sealant through your valve into your tyre.
No Puncture Hassle Sealant
This set comes with two bags of Muc-Off lightweight sealant, which fills a puncture up to 6 mm easily and quickly. Plus, the UV dye makes it easy to detect a leak. The bag has a capacity of 140 ml, enough for even the widest mountain bike tyres, and fits seamlessly onto the tubeless valve for ultimate convenience.
1 x 10 m long roll of Tubeless Rim Tape (choice of 21, 25 or 30 mm width)
2 x Rim tape sticker
2 x Tubeless Valve (black)
1 x Valve core remover
3 x Rubbers for valves
2 x No-Puncture Hassle Tubeless Sealant
2 x Rim tape sticker
2 x Tubeless Valve (black)
1 x Valve core remover
3 x Rubbers for valves
2 x No-Puncture Hassle Tubeless Sealant
Step 1: Remove any old rim tape or tape and clean the rim.
Step 2: Make sure the rim is clean and dry before applying the tape.
Step 3: Remove the tape from the packaging and align it from the opposite side of the valve.
Step 4: Start unwinding a small piece of the tape and press it down with your thumb or finger to apply pressure.
Step 5: Hold on while pulling on the tape and tape it down tightly. Once you have a few cm on the trim, it will stick and holding is no longer necessary.
Step 6: Go completely around the rim like this (if it has a large cavity, you can pull and wiggle the tape to fill any edges).
Step 7: Overlap the tape by about 10 - 15 cm.
Step 8: Leave a small piece loose so you can cut off the excess.
Step 9: Once cut, pull the tape down to create a seal.
Step 10: Go around the rim with your thumb to make sure there are no air bubbles or messy areas.
Step 11: When you are happy with how it looks, use a small pin to find the valve hole and poke neatly through the tape, ready for the valve.
Step 12: Take your tubeless valve and remove the locknut and o-ring.
Step 13: Choose the right rubber fit for your rim tape and insert the valve into the rim.
Step 14: Reinstall the O-ring and locknut, making sure to lock the valve (don't over-tighten as this may damage the rubber).
Step 15: Reinstall your tyre of choice, being careful not to damage the tape (by using tyre levers, for example).
Step 16: Pump air into the tyre to create a fit (you should hear some popping noises around the rim).
Step 17: Release air and remove the valve core using the spare valve cap.
Step 18: Take the Sealant Pouch and shake it well before use.
Step 19: Unscrew the cap and attach it to the valve in an upright position.
Step 20: While holding the pouch, turn the wheel downwards so that the pouch is now upside down.
Step 21: Add the sealant by rolling the pouch downwards.
Step 22: Turn the wheel upright again and remove the pouch.
Step 23: Reinsert the valve core and pump up to your desired tyre pressure.

Gör dina MTB-hjul slanglösa
Läs merRecensioner
Recensioner
Genomsnitt av 8 recensioner
Foton från kunder
Senaste recensionerna
5 / 5
Precis rätt
- Joris 26 januari 2026
Har aldrig själv slangat en uppsättning hjul tidigare, men det gick utan problem. Perfekt för den som vill prova själv!
För- & Nackdelar
Enkla instruktioner
Komplett uppsättning
Solid
Nej till
Automatiskt översatt
5 / 5
produkt av högsta kvalitet
- Danny 17 mars 2025
lätt att använda, särskilt tack vare muc-offs onlinevideo
För- & Nackdelar
bra online-video
lätt att använda
mycket variation i ventiler
tätar bra!
ingen förklaring av vilken ventil som är bäst att använda
Automatiskt översatt
4 / 5
Gör vad den behöver göra
- Michael 21 november 2024
Lätt att applicera och brukar oftast ha bra kvalitet. I mitt fall var en ventil trasig, jag hade en annan liggande så det löstes snabbt
För- & Nackdelar
Gör enkelt däcken slanglösa
Komplett uppsättning
En ventil var trasig
Automatiskt översatt
5 / 5
Prisvärd slanglös uppsättning
- Matthijs 22 augusti 2024
Bra att installera själv, läckte initialt något men efter några omgångar stänger små läckor av sig själva
För- & Nackdelar
Bra uppsättning att göra själv
Tillräckligt med tejp
Ventil med flera anslutningsgummin
Extra latexpåse skulle vara praktiskt
Automatiskt översatt
5 / 5
Allt du behöver för att göra dina däck slanglösa i 1 förpackning
- Steve 14 augusti 2024
Uppfyller helt förväntningarna, har aldrig gjort däck slanglösa så enkelt
För- & Nackdelar
Lätt att använda
Automatiskt översatt
5
Matthijs, 22 augusti 2024
Prisvärd slanglös uppsättning
Bra att installera själv, läckte initialt något men efter några omgångar stänger små läckor av sig själva
-
Bra uppsättning att göra själv
-
Tillräckligt med tejp
-
Ventil med flera anslutningsgummin
-
Extra latexpåse skulle vara praktiskt
Automatiskt översatt
Ofta köpta tillsammans
Ofta köpta tillsammans
Rekommenderad av produktspecialisten
Rekommenderad av produktspecialisten

