 Nederland
 België
 Deutschland
 Finland
 Ireland
 Luxembourg
 Portugal
 Poland
 Österreich
 France
 España
 Italia
 Sverige
 Danmark


- Consegna 3-5 giorni lavorativi
- Spedizione gratuita da € 99,00
- Valutazione Trustpilot 4.6/5
- Restituzione facile


Fai una domanda su questo prodotto

Pro e Contro
Pro e Contro
- Complete set with everything you need!
- For your mountain bike, gravel bike or road bike.
- Available in three different variants, varying in rim tape width.
- Only available with a valve length of 44 mm.
Caratteristiche tecniche
Caratteristiche tecniche
| Marca | Muc-Off | |
| Tipo | Set | |
| Lunghezza valvola | 44 mm |
Tubeless Valves
The new lightweight tubeless valves from Muc-Off are made of high quality and strong 7075 aluminium and make inflating your tyres even easier, thanks to the special airflow system. The included core remover makes it easy to run sealant through your valve into your tyre.
No Puncture Hassle Sealant
This set comes with two bags of Muc-Off lightweight sealant, which fills a puncture up to 6 mm easily and quickly. Plus, the UV dye makes it easy to detect a leak. The bag has a capacity of 140 ml, enough for even the widest mountain bike tyres, and fits seamlessly onto the tubeless valve for ultimate convenience.
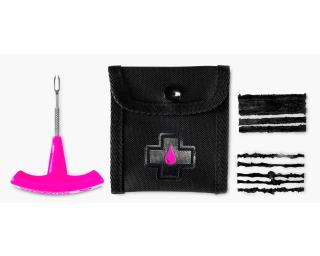
2 x Rim tape sticker
2 x Tubeless Valve (black)
1 x Valve core remover
3 x Rubbers for valves
2 x No-Puncture Hassle Tubeless Sealant
Step 2: Make sure the rim is clean and dry before applying the tape.
Step 3: Remove the tape from the packaging and align it from the opposite side of the valve.
Step 4: Start unwinding a small piece of the tape and press it down with your thumb or finger to apply pressure.
Step 5: Hold on while pulling on the tape and tape it down tightly. Once you have a few cm on the trim, it will stick and holding is no longer necessary.
Step 6: Go completely around the rim like this (if it has a large cavity, you can pull and wiggle the tape to fill any edges).
Step 7: Overlap the tape by about 10 - 15 cm.
Step 8: Leave a small piece loose so you can cut off the excess.
Step 9: Once cut, pull the tape down to create a seal.
Step 10: Go around the rim with your thumb to make sure there are no air bubbles or messy areas.
Step 11: When you are happy with how it looks, use a small pin to find the valve hole and poke neatly through the tape, ready for the valve.
Step 12: Take your tubeless valve and remove the locknut and o-ring.
Step 13: Choose the right rubber fit for your rim tape and insert the valve into the rim.
Step 14: Reinstall the O-ring and locknut, making sure to lock the valve (don't over-tighten as this may damage the rubber).
Step 15: Reinstall your tyre of choice, being careful not to damage the tape (by using tyre levers, for example).
Step 16: Pump air into the tyre to create a fit (you should hear some popping noises around the rim).
Step 17: Release air and remove the valve core using the spare valve cap.
Step 18: Take the Sealant Pouch and shake it well before use.
Step 19: Unscrew the cap and attach it to the valve in an upright position.
Step 20: While holding the pouch, turn the wheel downwards so that the pouch is now upside down.
Step 21: Add the sealant by rolling the pouch downwards.
Step 22: Turn the wheel upright again and remove the pouch.
Step 23: Reinsert the valve core and pump up to your desired tyre pressure.
Recensioni
Recensioni
Foto dei clienti

Recensioni più recenti
5 / 5
prodotto di alta qualità
Facile da usare, soprattutto grazie ai video online di muc-off.
Pro e Contro
4 / 5
Fa quello che deve fare
Facile da applicare e solitamente di buona qualità. Nel mio caso, una valvola era rotta, ma ne avevo un'altra in giro e quindi il problema è stato risolto rapidamente.
Pro e Contro
5 / 5
Set tubeless conveniente
Ottimo da installare da soli, inizialmente perdeva leggermente ma dopo qualche giro le piccole perdite si chiudono da sole
Pro e Contro
5 / 5
Tutto ciò che ti serve per rendere i tuoi pneumatici tubeless in 1 confezione
Soddisfa pienamente le aspettative, non ho mai montato pneumatici tubeless così facilmente
Pro e Contro
5 / 5
Consigliato.
Ho montato per la prima volta un tubeless, senza problemi grazie a questo prodotto.
4
Fa quello che deve fare
Facile da applicare e solitamente di buona qualità. Nel mio caso, una valvola era rotta, ma ne avevo un'altra in giro e quindi il problema è stato risolto rapidamente.
-
Pneumatici tubeless facili da montare
-
Set completo
-
Una valvola era rotta
5
Set tubeless conveniente
Ottimo da installare da soli, inizialmente perdeva leggermente ma dopo qualche giro le piccole perdite si chiudono da sole
-
Nastro adesivo sufficiente
-
Un ottimo set da fare da soli
-
Valvola con più gommini di collegamento
-
Un sacchetto di lattice extra sarebbe utile
Spesso acquistati insieme
Spesso acquistati insieme
Consigliato dagli specialisti del prodotto
Consigliato dagli specialisti del prodotto

