 Nederland
 België
 Deutschland
 United Kingdom
 Finland
 Ireland
 Luxembourg
 Portugal
 Poland
 Österreich
 France
 España
 Italia
 Sverige
 Danmark


How-To: Speedplay, Maintaining and Assembling Cleats
Speedplay pedals: they look good and work great, but it may be a good idea to service them every once in awhile.
In this article:
- Zero pedals
- When to clean them
- How to assemble speedplay cleats
- Adjusting the mobility
Zero Pedals
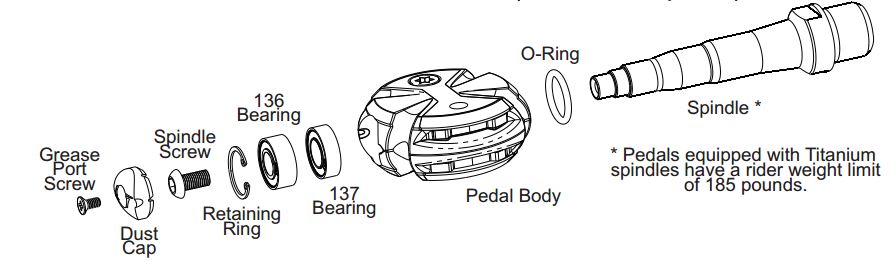
Speedplay pedals are quite advanced. They consist of two industrial bearings and an external lubrication port. There also is a needle bearing in the pedal body that can’t be removed. The possibility to lubricate the pedals increases their durability, and it is very easy to do. The only thing you need is a Speedplay grease gun.
Should you want to dissemble the pedals, here is the manual.
When?
Speedplay recommend maintenance every 2000 miles/3200 km or every 3 months. It is advisable to lubricate the pedals after rainy or dusty weather. Late maintenance can influence the warranty of your Speedplay pedals.
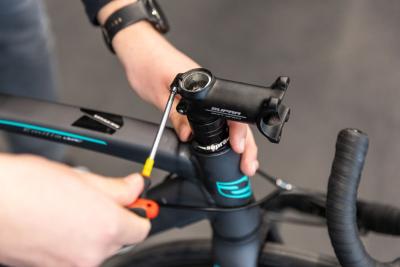
How to lubricate the pedal
- Remove the lubrication port screw with a Phillips #1 screwdriver
- Put the grease gun in the small hole
- Pump the grease while slowly turning the pedal. If you do it right, dirty grease comes out of the other side of the axle. Continue until the grease that comes out looks clean.
- Remove the excess grease and re-attach the screw, but don’t screw it on too tightly because you could damage the thread in the dust cover.
Assembling the speedplay cleats
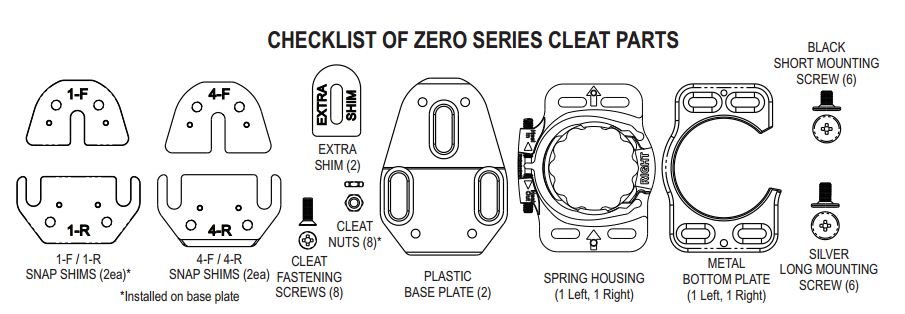
The new generation cleats, launched in 2015 are the V.2. Cleats. You can find this on the spacer with “V2” on it. You should have the following parts:

To be entirely clear: if you have the V1 cleats, you have these parts.
These spacers are necessary to fit them to your shoes. Because the click-mechanism is integrated in the cleat, it is important they fit precisely.

Of course you could also search for the right settings yourself, but luckily Speedplay created a list of shoes and the necessary parts.
| Bontrager Nylon | Spacers 5-F en 5-R | |
| Bontrager Silver Series Carbon | Spacers 5-F en 5-R | |
| Gaerne | Spacers 5-F en 5-R | |
| Giro Carbon | Spacers 5-F en 5-R | |
| Mavic | Spacers 5-F en 5-R | |
| Northwave | Spacers 5-F en 5-R | |
| Scott Carbon | Spacers 5-F en 5-R | |
| Sidi Vent Carbon | Spacers 5-F en 5-R | |
| Specialized | Spacers 5-F en 5-R |

Mounting Zero Cleat on 3-hole shoe
- If you take a look at the above table, you know which spacers to use. Do pay attention you use the right cleats on the right side, they are marked as either left or right. The 5-F & F-R spacers are pre-installed on the V2 black base plate. If you need two 6-F & 6-R spacers you have to remove the pre-installed spacers. Be careful when removing them, and don’t loose the small nuts that are underneath the spacers. Then mount the two 6-F & 6-R spacers, and turn the base plate around.
- Use the right mounting screws (5mm). (6) in the illustration. The short screws are black, the long screws are silver. You used the right screws if the screw is tightened after 5 whole rotations of the screwdriver. If the screws are too short you could rip them from the sole, if they are too long you could feel them with your feet.
- Put the Zero V2 base plate on both shoes.
- Position the base plate, a guideline is to have the ⅔ line of the base plate underneath the ball of the feet (or position the plate however you prefer of course). Screw the base plate with a #2 Phillips screw driver. Maximum torque is 4.0 Nm. If the base plate isn’t flat on top, it is not installed correctly. If the base plate is too high in the middle, use the shim (2) and put it underneath the front 6-F spacer and the sole. If the cleat is twisted, use the extra shim under the screw where the cleat is twisted.
- When the base plate is attached, it is time to attach the cleats. Click the metal plate on the spring housing. You should be able to read the words ‘left’ and ‘right’, if you can’t: turn the plate around 180°.
- Now tighten the four 4x12mm screws a bit, don’t fasten them too tightly yet. First we have to adjust the lateral play.
- Put the left shoe on the left pedal and adjust the shoe to the crankarm. It is better to attach it as closely as possible to the crank arm, but the heel or nose of the shoe shouldn’t hit the crankarm of course.
- Now that you determined the right position, you can tigh
- ten the screws to 2.5 Nm torque. If you don’t have a torque wrench, tighten them until you feel the screwheads cling to the plate, then do not turn the screws further than 90°.
Mounting Zero Cleat on 4-hole shoe
- Use a V2 protector shim kit. There is a chance of damaging because the sole is close to the carbon, but an aluminium protector will prevent this.
- Now start with step 5
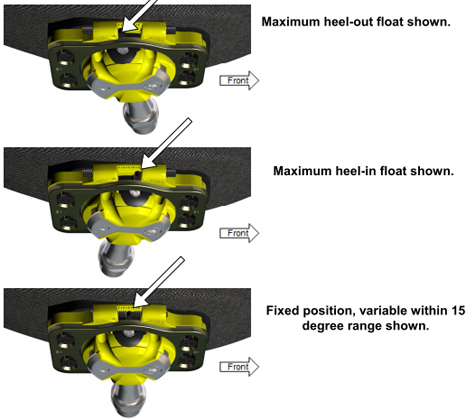
Adjusting mobility
The Speedplay Zero pedal offers the opportunity to adjust the mobility between 0-15°. With a small #1 phillips screwdriver you can drive in one or both of the pins. See the illustration below. It is possible to adjust the heel-in/heel-out float.
Translated by - Mirte Faber
Simon Kikken
Nature, forests, single tracks- nothing quite beats it! I've been active as an amateur racer for several years now in XC and Marathon events. I use a BMC Fourstroke FS01 or Trek Superfly Elite for the single tracks, and a singlespeed cyclocross- or roadbike for the fun. I work as a manager at Mantel.com.
Related posts

How To Plan a Route Using Komoot? [How-To]
27 March 2023Planning and finding your own cycle routes sounds more complicated than it actually is ...
Do your own bike maintenance work! [Do It Yourself Tips]
7 February 2023Buying a new road, mountain or gravel bike is one thing. Maintaining your bike properly is another ...
Replace the stem of your road bike in 11 steps [Bike Techcenter]
26 April 2022For road cyclists, being comfortable on your bike is of the utmost importance ...